(part 13) by Bill Black
MORE WORK ON THE ORGAN CASE
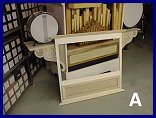 Being no longer able to resist doing some more work on the case so I can begin to see what the final appearance will be, Iąll go back and work on that for awhile. I have a picture in my mind as to how I want to decorate the case. I plan to use oil paintings in some of the front cutout spaces. I notice that the lower panel where I plan a painting is inaccessible from the back of the organ front if the case is put together as Wurlitzer constructed it. In the Wurlitzer design, the frame of the organ front is not removable, just the insert on the upper half of the front. I will deviate a bit from this construction and make the front of the organ removable, being attached to the main case with screws inserted from the side. PHOTO A shows the completed frame for the front. The decorative molding on the front is attached to the top and bottom of the front. This allows the entire front (not including the base) to be easily removed. It permits better access to the pipework and the lower panel. The insert for the lower panel can be removed from the back and allow me to insert the painting.
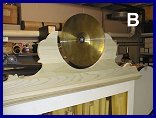 PHOTO B shows the decorative top piece, which we will call the crown, mounted on the organ case. The diameter of the cymbal was used to determine the shape of the cutout area for the cymbal. There is a bit of scroll work around the cymbal which we will make later.
 PHOTO C shows the cymbal beater mechanism mounted on the top of the organ. Hinges with removable pins are used to attach the crown to the top. This piece is easily removed by pulling out the pins. It also allows the crown to be tilted back a bit to remove the front. Last month we showed a picture of the wooden block mounted of the underside of the top with the nipple for the tubing to the cymbal. PHOTO C also shows the rubber tubing from this nipple to the beater mechanism. The beater mechanism is mounted on the top by means of a slot and block arrangement. The block can swivel and allow it to slip through the slot in the base in order to remove the beater mechanism from the organ easily.
In PHOTO D, the completed front (minus the upper insert) is shown along with the mounted crown.
PHOTO E shows the removable upper insert completed and mounted in the front. In designing the shape of the cutout areas, I noticed a problem. The front rank of pipes is slightly offset to one side of the windchest. I am planning to have this center area open so the pipework can be seen. The paintings will be inserted in the two side cutouts.
 This offset creates the visual impression that the pipes are not centered in the center area. To get around this problem, I adjusted the widths of the side cutout areas and the adjacent edges a bit to get the center area of the removable section to match the center of the pipe rank.
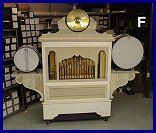 In PHOTO F we see the assembled front. The cutout frame for the paintings is removable and the entire front is also removable. All parts of the organ front are now accessible. We still have to make the two decorative scrolls which surround the cymbal on the crown. Next month we get the paintings............
Dr. Bill Black is one of the nation's most knowledgeble Wurlitzer band organ experts. He has made recordings of many band organs and other mechanical music machines which are available for purchase at CarouselStores.com.