by Bill Black
DECORATING THE ORGAN CASE
This month we will decorate the organ case. Some months ago, Bette Largent wrote a great article for the e-zine entitled ALL THAT GOLD. Rather than using the actual gold leaf, I used the composition leaf which Bette described, available in kit form from Old World Art in Ontario, California. (When I refer to gold leaf in this article, I mean the composite material). This material is very inexpensive and produces excellent results.
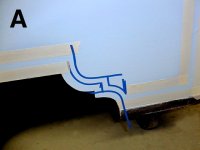 In PHOTO A, we will take a look at making gold leaf striping around the edges of the organ case. Using a pair of dividers with a scribing tip on the one end, I ran the other end along the edge of the case. This produced a scribed line on the case which matches the contour of the edge of the case. I then took a roll of thin plastic tape, one eighth of an inch wide and applied this to the scribed line. The tape is easily stretched into curves to follow the scribed line on the case and is sold for this purpose. A second line of tape is then placed parallel to the first by eye. The distance between these two lines of the plastic tape will determine the width of the gold leaf stripe. I made this area one half inch wide. In PHOTO A, the blue color tape is this plastic tape. For the straight line runs, I used masking tape. Care must be taken to be sure the edges of the tape where the leaf will be applied must be pressed down tightly to insure a nice clean line on the edge of the leafing when the tape is removed. A burnishing tool may be used for this.
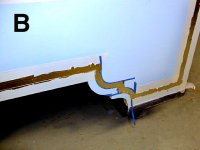 After the design of the areas where the gold leaf is to be applied is finished by the plastic and masking tape, a small brush is used to apply the adhesive-size to the surface to which the leaf will be applied. This is a liquid which after an hour or so dries to form a tacky surface. I then cut the leaf into stripes about a few inches long and a bit wider than the area to be covered. I used a sheet of cardboard to cut and transport the leaf stripes. You have to move slowly and carefully. As Bette states, any air currents, even breathing on them will cause them to fly away. With the pieces of leaf close to the work area, I carefully pick up a piece of leaf and apply it to the area coated with the adhesive. I use my finger to gently press the leaf into place. Subsequent pieces are allowed to overlap the previous piece a bit. Gently rubbing your finger on the leaf will cause any leaf not in contact with the adhesive to fall away leaving the joint between the pieces hardly visible. PHOTO B
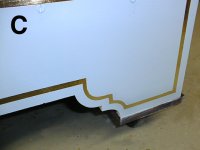 Once the leaf has been applied to all the areas prepared with the adhesive, I take care to see that all the leaf has been pressed into contact with the adhesive. Then, before removing the masking tapes, I run my finger nail along the edges of the leaf where the edge will be when the tape is removed. This insures that the edge of the leaf is completely in contact with the edge of the adhesive at the side of the tape. This helps to insure a nice straight edge to the gold leaf strip when the masking tape is removed. PHOTO C.
 Once is awhile, a bit of the leaf will fail to stick to the adhesive and you have a bare spot. Itąs easily fixed by applying a bit more adhesive to the bare spot. After waiting a period of time, another piece of leaf can be applied. This material is very forgiving and easy to work with. I did learn that any roughness on the surface you are trying to leaf will appear in the leafing. So, the smoother the surface, the flatter the leaf will look. It is so thin that any defects in the wood will become obvious. After you are satisfied with the application of the leaf, the kit provides a clear coat liquid to be applied to seal the edges of the leaf and cover it to protect it. I learned that burnishing the leafing sort of takes the shine off of it depending on the coarseness of the material used to burnish it. I preferred the leaf to have a rather shiny appearance and avoided this burnishing as much as possible. The leaf does not stretch and when applied to surfaces with some relief detail, the leaf usually tears and leaves uncovered areas. If you are careful not to touch the uncovered areas with your finger and getting the oil from your skin on it, you can usually apply another small piece of leaf to this area and it blends in very nicely.
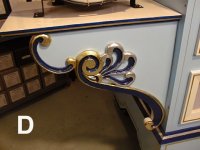
 This leaf can be obtained in gold, silver and copper colors. I used a combination of the gold and silver colors on the case. PHOTO D shows both the gold and silver leaf applied to the carvings on the drum wing. I also applied some gold leaf striping on the sides and the back of the organ case.
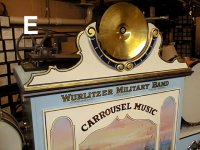
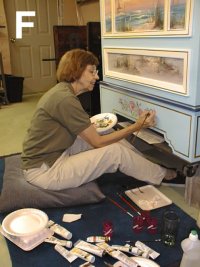 PHOTO E shows the top of the organ front. This technic of applying the leaf has been used on the top scroll and around the insert holding the picture on the organ front. A large Wurlitzer Military Band decal has been applied and the Carrousel Music name was lettered by a local sign company.
This completes my decoration of the front. But, we need a finishing touch. Local professional artist, Trish Owens, hand paints some floral designs on the case for me (PHOTO F). The completed decoration of the organ will be seen next month. That will be the final installment of this series on the 105 restoration. Our next project will be the restoration of a Tangley Calliope. A new series of articles describing this project will begin in the near future.
Dr. Bill Black is one of the nation's most knowledgeble Wurlitzer band organ experts. He has made recordings of many band organs and other mechanical music machines which are available for purchase at CarouselStores.com.