
Now that we have installed the stack and constructed the pipework, we can begin some further assembly of the organ. PHOTO A shows the completed pipework installed on the top of the windchest (front view).
 Since we had all the toe boards for this pipework, all we need to do with these is to sand them a bit to clean them up and apply some finish. All these toe boards have a slider which serves to interrupt the wind supply which provides a means to shut off the pipes. The slider consists of a thin strip of wood with holes to match the holes in the toe board. When this strip is moved sideways, these holes no longer line up with the toe board holes and the wind passage is blocked. These sliders are called draw stops. Missing were the sliders for the front 2 ranks. These are easily made with a wood planer and a drill press. The sliders for the front two ranks are moved back and forth using two small wooden knobs. These knobs are located just to the right of the toe board on PHOTO A. Graphite is applied to the sliders to make them move a bit easier.
 The sliders on the back three ranks are moved by means of a metal rod which is connected to the slider and projects through the side of the organ case. Wurlitzer used a metal knob on this rod. Since these are missing, we will need to fabricate them. PHOTO B shows a completed knob and rod. These were made using a template which was made from an existing knob on a 125 organ. A piece of solid metal is placed on a lathe and turned down using the template from time to time to check the progress. After the knob is roughed out, files are used to finish the knob to the proper contour. The finished knob is drilled and tapped for the metal rod which has been threaded with a die. The knob is screwed on the rod and the other threaded end is inserted through a hole in the case and screwed into a wooden block on the end of the slider. This arrangement allows you to turn these three ranks off from the outside of the organ case by pulling the knobs out.
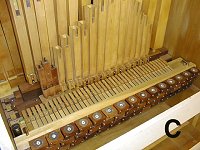 As mentioned last month, the stack was installed in the organ. PHOTO C shows a view from the back of the organ where we can see the pipework from that aspect. Note the three small pipes on the left of the photo. These were part of the original pipework that we had. As mentioned in a previous article, Wurlitzer placed several of the stopped pipes of the melody section bottom pipes on top of the windchest due to a lack of space under the organ. These pipes are connected to the appropriate windchest channel by some windway channels in a small riser board on top of the toe board. The other three stopped pipes are mounted on another toe board (pipes are not visible in this photo).
 We will wait till later to attach the wooden strips to the pipework to tie them together for support. After the pressure pump is installed and we have wind pressure available, we will need to be able to remove individual pipes easily to touch up the voicing.
We will next rough out the shelf on which the roll frame mechanism will be mounted. (PHOTO D) We wonąt cut this to the exact size yet until the vacuum pump and pressure pump are restored and placed in the organ.
Dr. Bill Black is one of the nation's most knowledgeble Wurlitzer band organ experts. He has made recordings of many band organs and other mechanical music machines which are available for purchase at CarouselStores.com.