
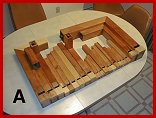
 The next step of our restoration is the pipework. Photo A shows the
completed bottom pipes. These are all stopped pipes which will be
fastened to the underside of the bottom of the organ case. Mike has
restored these pipes. We had some of the pipes intact, some in pieces and
some missing. The larger pipes are mitered to fit in the case. Someone
had demitered the largest pipe to make a straight pipe apparently in an
attempt to use this pipe for some other purpose. Mike corrected this,
made the missing pieces for other pipes and fabricated the missing pipes.
These pipes include 5 bass pipes, 9 accompaniment pipes and 8 melody
pipes. As Wurlitzers design did not include enough room in the case
bottom for the full set of melody pipes, the remaining 6 pipes of this
melody section are included with the pipes on top of the windchest.
The next step of our restoration is the pipework. Photo A shows the
completed bottom pipes. These are all stopped pipes which will be
fastened to the underside of the bottom of the organ case. Mike has
restored these pipes. We had some of the pipes intact, some in pieces and
some missing. The larger pipes are mitered to fit in the case. Someone
had demitered the largest pipe to make a straight pipe apparently in an
attempt to use this pipe for some other purpose. Mike corrected this,
made the missing pieces for other pipes and fabricated the missing pipes.
These pipes include 5 bass pipes, 9 accompaniment pipes and 8 melody
pipes. As Wurlitzers design did not include enough room in the case
bottom for the full set of melody pipes, the remaining 6 pipes of this
melody section are included with the pipes on top of the windchest.
 My task was to build the pipework for the top of the windchest which was
missing. The only pipe parts we had for those on the top of the windchest
were the boots and reed assembly for the trumpets and the toe boards for
the various ranks of pipes. This of course saved a lot of work as these
did not have to be fabricated.
My task was to build the pipework for the top of the windchest which was
missing. The only pipe parts we had for those on the top of the windchest
were the boots and reed assembly for the trumpets and the toe boards for
the various ranks of pipes. This of course saved a lot of work as these
did not have to be fabricated.
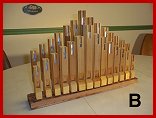
Photo B shows the two front ranks of pipes, a piccolo rank and a flagolet rank. Most 105 organs had a rank of brass piccolos. I decided to use a rank of wooden piccolos using the same pipe scale as those in our 153 organ.
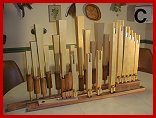 Photo C shows the accompaniment violin rank and the rank of trumpets. As
mentioned above, we had the boots etc. for the trumpets so all that was
needed to be built for the trumpets were the resonators. Mike restored
the reed and shallot assemblies for the trumpet rank. The three smaller
pipes in the accompaniment rank toe board are three of the stopped flutes
which are part of the bottom melody pipe section.
Photo C shows the accompaniment violin rank and the rank of trumpets. As
mentioned above, we had the boots etc. for the trumpets so all that was
needed to be built for the trumpets were the resonators. Mike restored
the reed and shallot assemblies for the trumpet rank. The three smaller
pipes in the accompaniment rank toe board are three of the stopped flutes
which are part of the bottom melody pipe section.
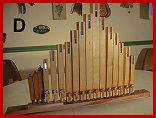
In Photo D we see the rank of melody violins. Here we also see the remaining 3 stopped pipes of the bottom melody pipe section.
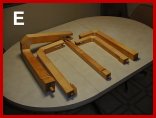
Photo E shows the 5 bass cello pipes. As 4 of these are too long to fit in the case upright, they are mitered to fit.
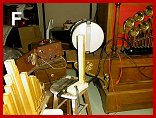
 In order to voice and tune the pipes to be sure they will play the
correct note, we need a constant source of wind pressure at the proper
pressure. For this we will use our 125 organ. A single piccolo pipe was
removed, a toe inserted into the toe board and a tube run from it to a
wood block. The wood block will serve as a toe board in which the pipe to
be tested will be inserted. In Photo F we can see the wood block clamped
to a stool with a single pipe inserted. With the 125 organ on, a test
roll inserted activating the piccolo note, wind is blown into the wood
block and serves as a wind source to test the pipe. By placing a pipe in
the wood block, the cap can be positioned before the glue takes hold to
the correct position for the best sound. Note the Conn Strobotuner behind
the wood block. The tuner gives us a visual display of the pitch of the
note being played. We use this to tune the pipe with the pipes tuning
slide and also to adjust the frein on the violin pipes. All pipes which
were built were checked and tuned to their proper pitch. Later on we
will adjust the wind pressure of the pressure bellows on the 105 to match
the pressure produced by the 125 organ since the pipework has been
adjusted to operate at that pressure.
In order to voice and tune the pipes to be sure they will play the
correct note, we need a constant source of wind pressure at the proper
pressure. For this we will use our 125 organ. A single piccolo pipe was
removed, a toe inserted into the toe board and a tube run from it to a
wood block. The wood block will serve as a toe board in which the pipe to
be tested will be inserted. In Photo F we can see the wood block clamped
to a stool with a single pipe inserted. With the 125 organ on, a test
roll inserted activating the piccolo note, wind is blown into the wood
block and serves as a wind source to test the pipe. By placing a pipe in
the wood block, the cap can be positioned before the glue takes hold to
the correct position for the best sound. Note the Conn Strobotuner behind
the wood block. The tuner gives us a visual display of the pitch of the
note being played. We use this to tune the pipe with the pipes tuning
slide and also to adjust the frein on the violin pipes. All pipes which
were built were checked and tuned to their proper pitch. Later on we
will adjust the wind pressure of the pressure bellows on the 105 to match
the pressure produced by the 125 organ since the pipework has been
adjusted to operate at that pressure.
 The piccolo and flagolet ranks were constructed using cherry for the
fronts, mouth block and cap. Spruce was used for the sides and back.
The piccolo and flagolet ranks were constructed using cherry for the
fronts, mouth block and cap. Spruce was used for the sides and back.
 The trumpet resonators were made from spruce. The violins and cellos are
made with birch for the front, mouth block and cap. The sides and back
were made from spruce. The violin freins were fabricated from sheet brass
using a metal shear and a milling machine.
The trumpet resonators were made from spruce. The violins and cellos are
made with birch for the front, mouth block and cap. The sides and back
were made from spruce. The violin freins were fabricated from sheet brass
using a metal shear and a milling machine.
Dr. Bill Black is one of the nation's most knowledgeble Wurlitzer band organ experts. He has made recordings of many band organs and other mechanical music machines which are available for purchase at CarouselStores.com.